
Airshow photography: the ultimate guide!
- Kris Christiaens
- Feb 14, 2025
- 8 min read
Updated: Nov 30, 2025
Mankind has always looked up to the sky and wanted to fly. During airshows, mankind in combination with its old or modern machine demonstrates what he is capable of in the air and this often results in beautiful and spectacular shows. These airshows attrack a lot of people worldwide and are very popular among amateur and professional photographers. In this detailed article, professional aviation photographer Kris Christiaens gives eight tips for taking better photos at airshows and aviation events so anybody can portray aircraft and helicopters as creatively as possible.
Not just for big lenses
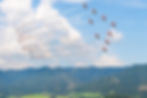
Anyone who regularly attends airshows or spotter days and takes pictures during such events quickly notices that a lot of people use gigantic large lenses that are also extremely expensive. For a beginning photographer, this can be particularly impressive and sometimes deterring. On one hand, the large lenses do provide you with a lot of millimeters at your disposal, allowing you to photograph aircraft in close-up, but this is still no guarantee for good and beautiful photos. The art of photography is to play and to be inventive with different types of lenses so that you do not always take the same kind of pictures. When famous formation teams such as the French Patrouille de France or the British Red Arrows give their show, you can perfectly use a wide-angle lens and you will quickly notice that this sometimes produces surprisingly beautiful photos. If you still want to take pictures with large zoom lenses such as a 500mm or a 600mm, there are specialized photo stores where you can rent them for a few days. This way you also learn how to take pictures with a different kind of lens and get more variety in your collection of photos.
Not only a blue sky is interesting
For a lot of people who often go to airshows or similar events, a beautiful blue sky is synonymous with beautiful and good photos. Personally, I do not agree with this at all since you can also take particularly beautiful pictures in cloudy or not so good weather conditions. A gray or dark sky at first glance often seems boring and photographically not beautiful but when you take photos in RAW and then edit them with software like Adobe Lightroom you will soon find that you can do a lot more with these photos. For example, in cloudy or dark conditions you can bring a lot of drama to photos or colored smoke coming from formation teams often comes out better as well. My experience has taught me that blue, clear skies in summer are often also detrimental to focus due to "heat haze" or excessively bright reflective sunlight. So don't be in a bad mood at all when you go to an airshow or spotter's day and the weather is not good. This may well give surprisingly beautiful effects.

Static is never boring
A lot of airshows and even smaller events not only have a flying program but also have a lot to offer on the ground. Such a section is called a "static show" and often consists of aircraft that are simply on display without any demonstration or show. Some airshows such as RIAT in the United Kingdom or the Belgian Air Force Days have a particularly large and impressive static show. Still, for many people and photographers this is often a "boring" part of an airshow since the aircraft at a static show are not always easy to photograph and they are often very close together. Let this be the big challenge to make something beautiful out of this. Try to step away from the classical compositions and try to experiment with close-ups and creative compositions. For example, a close-up of a cockpit or propeller or a combination of people and aircraft can often produce very nice photos.

Location
At an airshow, fly-in or a spotter's day, a lot of photographers try to stand as close to the "show center" as possible. This is the imaginary center of the area in which pilots may give their show or demonstration. Taking pictures from the 'show center' can produce beautiful and spectacular results as this is where they perform a 'break' or 'split' maneuver but the downside to this location is that almost everyone wants to stand here and you sometimes have to pay extra to be able to take pictures from this location. If you don't feel like paying extra and don't want to stand among the busy crowd, know that there are alternatives that sometimes provide nice surprises. For example, you can also stand at the end of the 'flight line' where it is more often quieter. The "flight line" is the imaginary line that pilots must follow. From the end of the 'flight line' you often have a better view of planes taking off or planes making steep turns. In some cases, it may also be advisable to take photos from outside an airport's domain. Such locations, which obviously must be accessible according to safety regulations, often provide different photos since you are not in the same location as the airshow visitors. For example, Totterdown Hill Campsite is a well-known alternative location for those who want to experience the Royal International Air Tattoo (RIAT) in the United Kingdom in a different way.
Panning
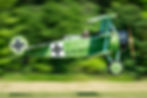
If you have the opportunity to stand along the runway to take pictures then it might be the perfect time to experiment a little more or to be more creative. One way to do this is to use the so-called "panning" technique. With this technique you try to capture the speed of a fast moving plane or helicopter by taking pictures of the object with a fluid motion. Here, as a result of the fluid motion combined with the slow shutter speed, the background becomes blurred and the object, in this case an airplane or helicopter, becomes sharp. However, the "panning" technique is not the easiest technique and requires some experience. For example, it is best to use this technique when you have a nice background such as trees or mountains and try to photograph objects moving in a straight line. Departing or landing fighter planes are perfect for this. However, because the "panning" technique involves working with slow shutter speeds of, say, 1/40 or 1/30 to get the background blurred, the chance of motion blur is high. A good tip when using this technique is to turn off your image stabilization of your lens as this usually ensures that movements are corrected. If you want to take many pictures with the 'panning' technique, it is best to use a monopod as well. Despite the fact that the panning technique is not easy, it can produce surprisingly beautiful pictures. The great advantage of this technique is that you can often practice it on the street with moving cars or with people walking, for example.
Backlight also works
One of the things aviation photographers often think about is the position of the sun when they may take pictures at an airport or during an airshow. As with other forms of photography (landscape photography, architectural photography, etc.), the position of the sun is often important when you want to take great pictures. For example, every photographer prefers the sun to be at his back so that the sunlight illuminates the object nicely. Unfortunately, the position of an airbase cannot be adjusted so some airshows or fly-in events are known for their backlight. Taking pictures with backlight (when the sun is directly in front of you) is not always easy and often produces disappointing results when you then take pictures of airplanes or helicopters in the sky. One of the most common problems here is that the photographed subject is very dark while the sky is often too bright or grey. Fortunately, there are editing programs like Adobe Lightroom and Adobe Photoshop that allow you to get rid of the effect of backlight during post-processing of a photo. Thus, by adjusting shadows, you can make dark objects in your photo brighter again and you can make overexposed regions in your photo less bright. Personally, I like to admit that I prefer to take pictures without backlighting, but thanks to some tricks during post-processing you can still get nice results.

RAW is essential!
Taking photos in RAW or in JPEG? It is a discussion that comes up very often among photographers. Those who start with photography will very often take pictures in JPEG but photographers who want to do more with their pictures or who are mainly interested in post-processing, only take pictures in RAW. Photos taken in JPEG undergo a certain compression so that the file is reduced in size and this is always accompanied by loss of quality. In addition, the possibilities for editing JPEG files after taking the picture are also limited. As the name implies, a photo in "RAW" is actually a "raw" and unedited version of the photo taken by the camera. RAW photos are also often compared to the former negative since it also formed the basis of every photo print. While a photo taken in JPEG is a small file with nothing more to do, a photo taken in RAW does need to be edited first in an editing program such as Adobe Photoshop, Adobe Lightroom, Capture One Pro or Luminar. These are also large files. The biggest advantage of RAW files is that you can make many adjustments without loss of quality and you can easily correct over- or underexposed photos. The chance of a 'bad' photo with RAW files will therefore be considerably smaller. Personally, I can only recommend taking photos in RAW as it offers a lot of possibilities, improves the quality of your photos and you can also be very creative with these files. The disadvantage of taking photos in RAW is that these files are much larger so you need more memory in your computer and it takes more time to finish your photos.

Autofocus
Photographing aircraft or helicopters doing a demonstration at an air show or spotters day with manual focus is quite challenging and not at all convenient. Manual focusing is mainly used in macro photography or when we photograph objects that are not flying around at high speed. To solve this problem, digital cameras and lenses are equipped with an autofocus (AF) system. With this system, the digital camera or lens automatically focuses on certain focus points. Within autofocus, there are three more settings from which we can choose how to focus: single AF, continuous AF and automatic AF. Personally, I use the continuous AF setting when taking pictures at an airshow since when you half-press the shutter button the camera keeps focusing on the chosen subject. This does only work when the subject is within the range of the focus points. The focus points themselves can be seen when looking through the camera viewfinder (red dots that light up) and can also be adjusted. If we choose the single autofocus, the camera focuses once when the shutter button is pressed halfway, even if the subject moves. With auto autofocus, we let the camera choose whether it focuses single or continuously. Note that using autofocus does not always guarantee razor-sharp images. For example, in some cases the camera or lens can automatically focus on the wrong subject, which can still result in blurred photos. Low-contrast subjects or poor lighting conditions can also cause problems in terms of autofocus.
Text & images: Kris Christiaens